Lutron Homeworks Tutorial

How to use a Lighting Floor plan

Welcome to this Lutron Homeworks QS Tutorial,
This tutorial highlights the key pieces of information on a Lighting Floor Plan that are needed  to commission and to program your first Lutron Homeworks QS project successfully .

Lutron Homeworks QS Tutorial How to use a Lighting Floorplan

Here is the Situation

Let’ s say that you need to go to site, to commission and to program a Lutron Homeworks QS project for the very first time. And you’re not very familiar on how this particular system has been wired or put together and what it involves? But  you need to have that system running and fully commissioned, by the end of the day.

So where do you start? and what do you need?

Click to enlarge

This is what you need

Document Listing
Click to enlarge

Well that’s very easy, to start you will need:

  • A Lighting floor plan or a Load schedule
  • As well as a Wiring schedule.

Let’s start with the Lighting Floor Plan as they are different ways lighting Floor Plan looks like

The Lighting Floor Plan

The most important pieces of information that you need to locate on your Lighting Floor Plan are:

  • Name of the rooms
  • The Lighting Circuits
  • Load type for those Lighting circuits
  • The Position and wiring of the Lutron Keypads
Lighting Floor Plan
Click to enlarge

The Room Layout

Name of the Rooms
Click to enlarge

Here you will notice that each room is clearly labelled So for exemple :

  • Entry Hall, Room A
  • Office, Room B
  • Corridor, Room D
  • Kitchen, Room E
  • Living, Room F
  • Exterior, Room G

Obviously, on your Lighting Floor Plan things will be slightly different. But it’s very important to pay attention to how those rooms have been named and how your project is built.
This will help you later on, to build your Homeworks database exactly as per the layout of your project and will allow you to program your system quickly and efficiently

Lighting Circuits

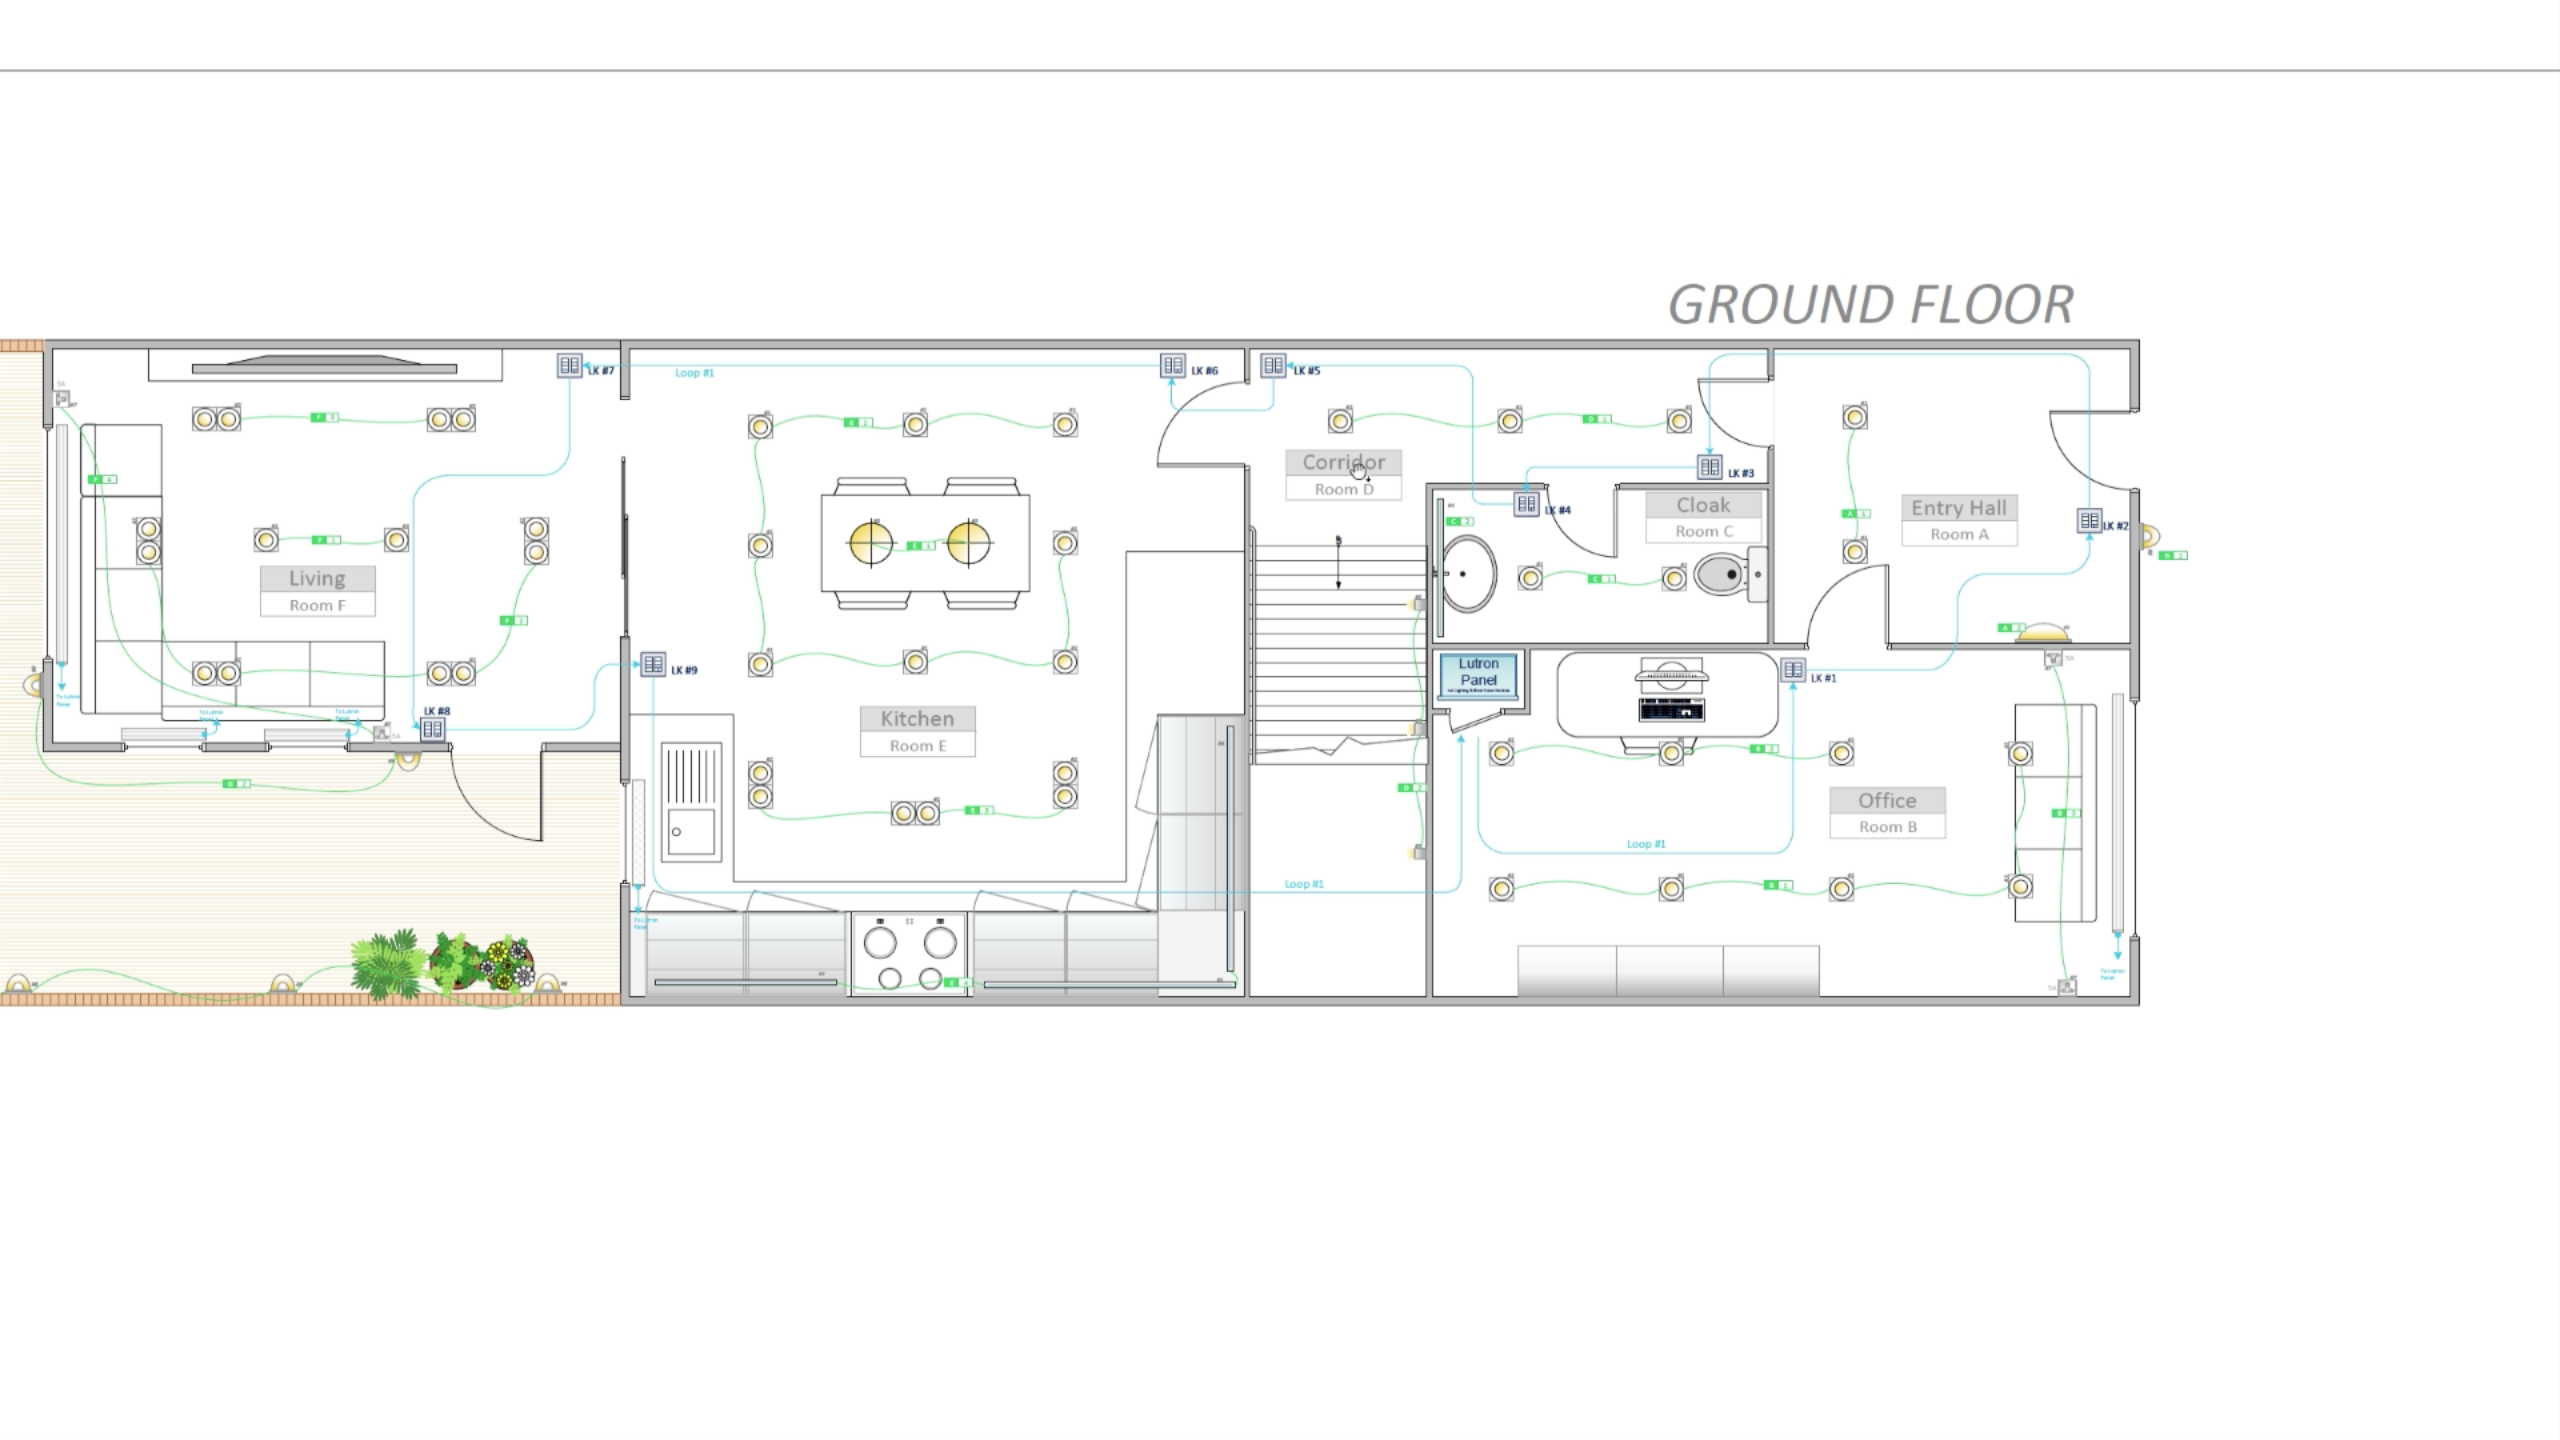
So what is a “Lighting Circuit“? (Or sometimes called a “Lighting Zone”)
A Lighting Circuit is a set of light fittings that are physically connected together in order to work as one.
 
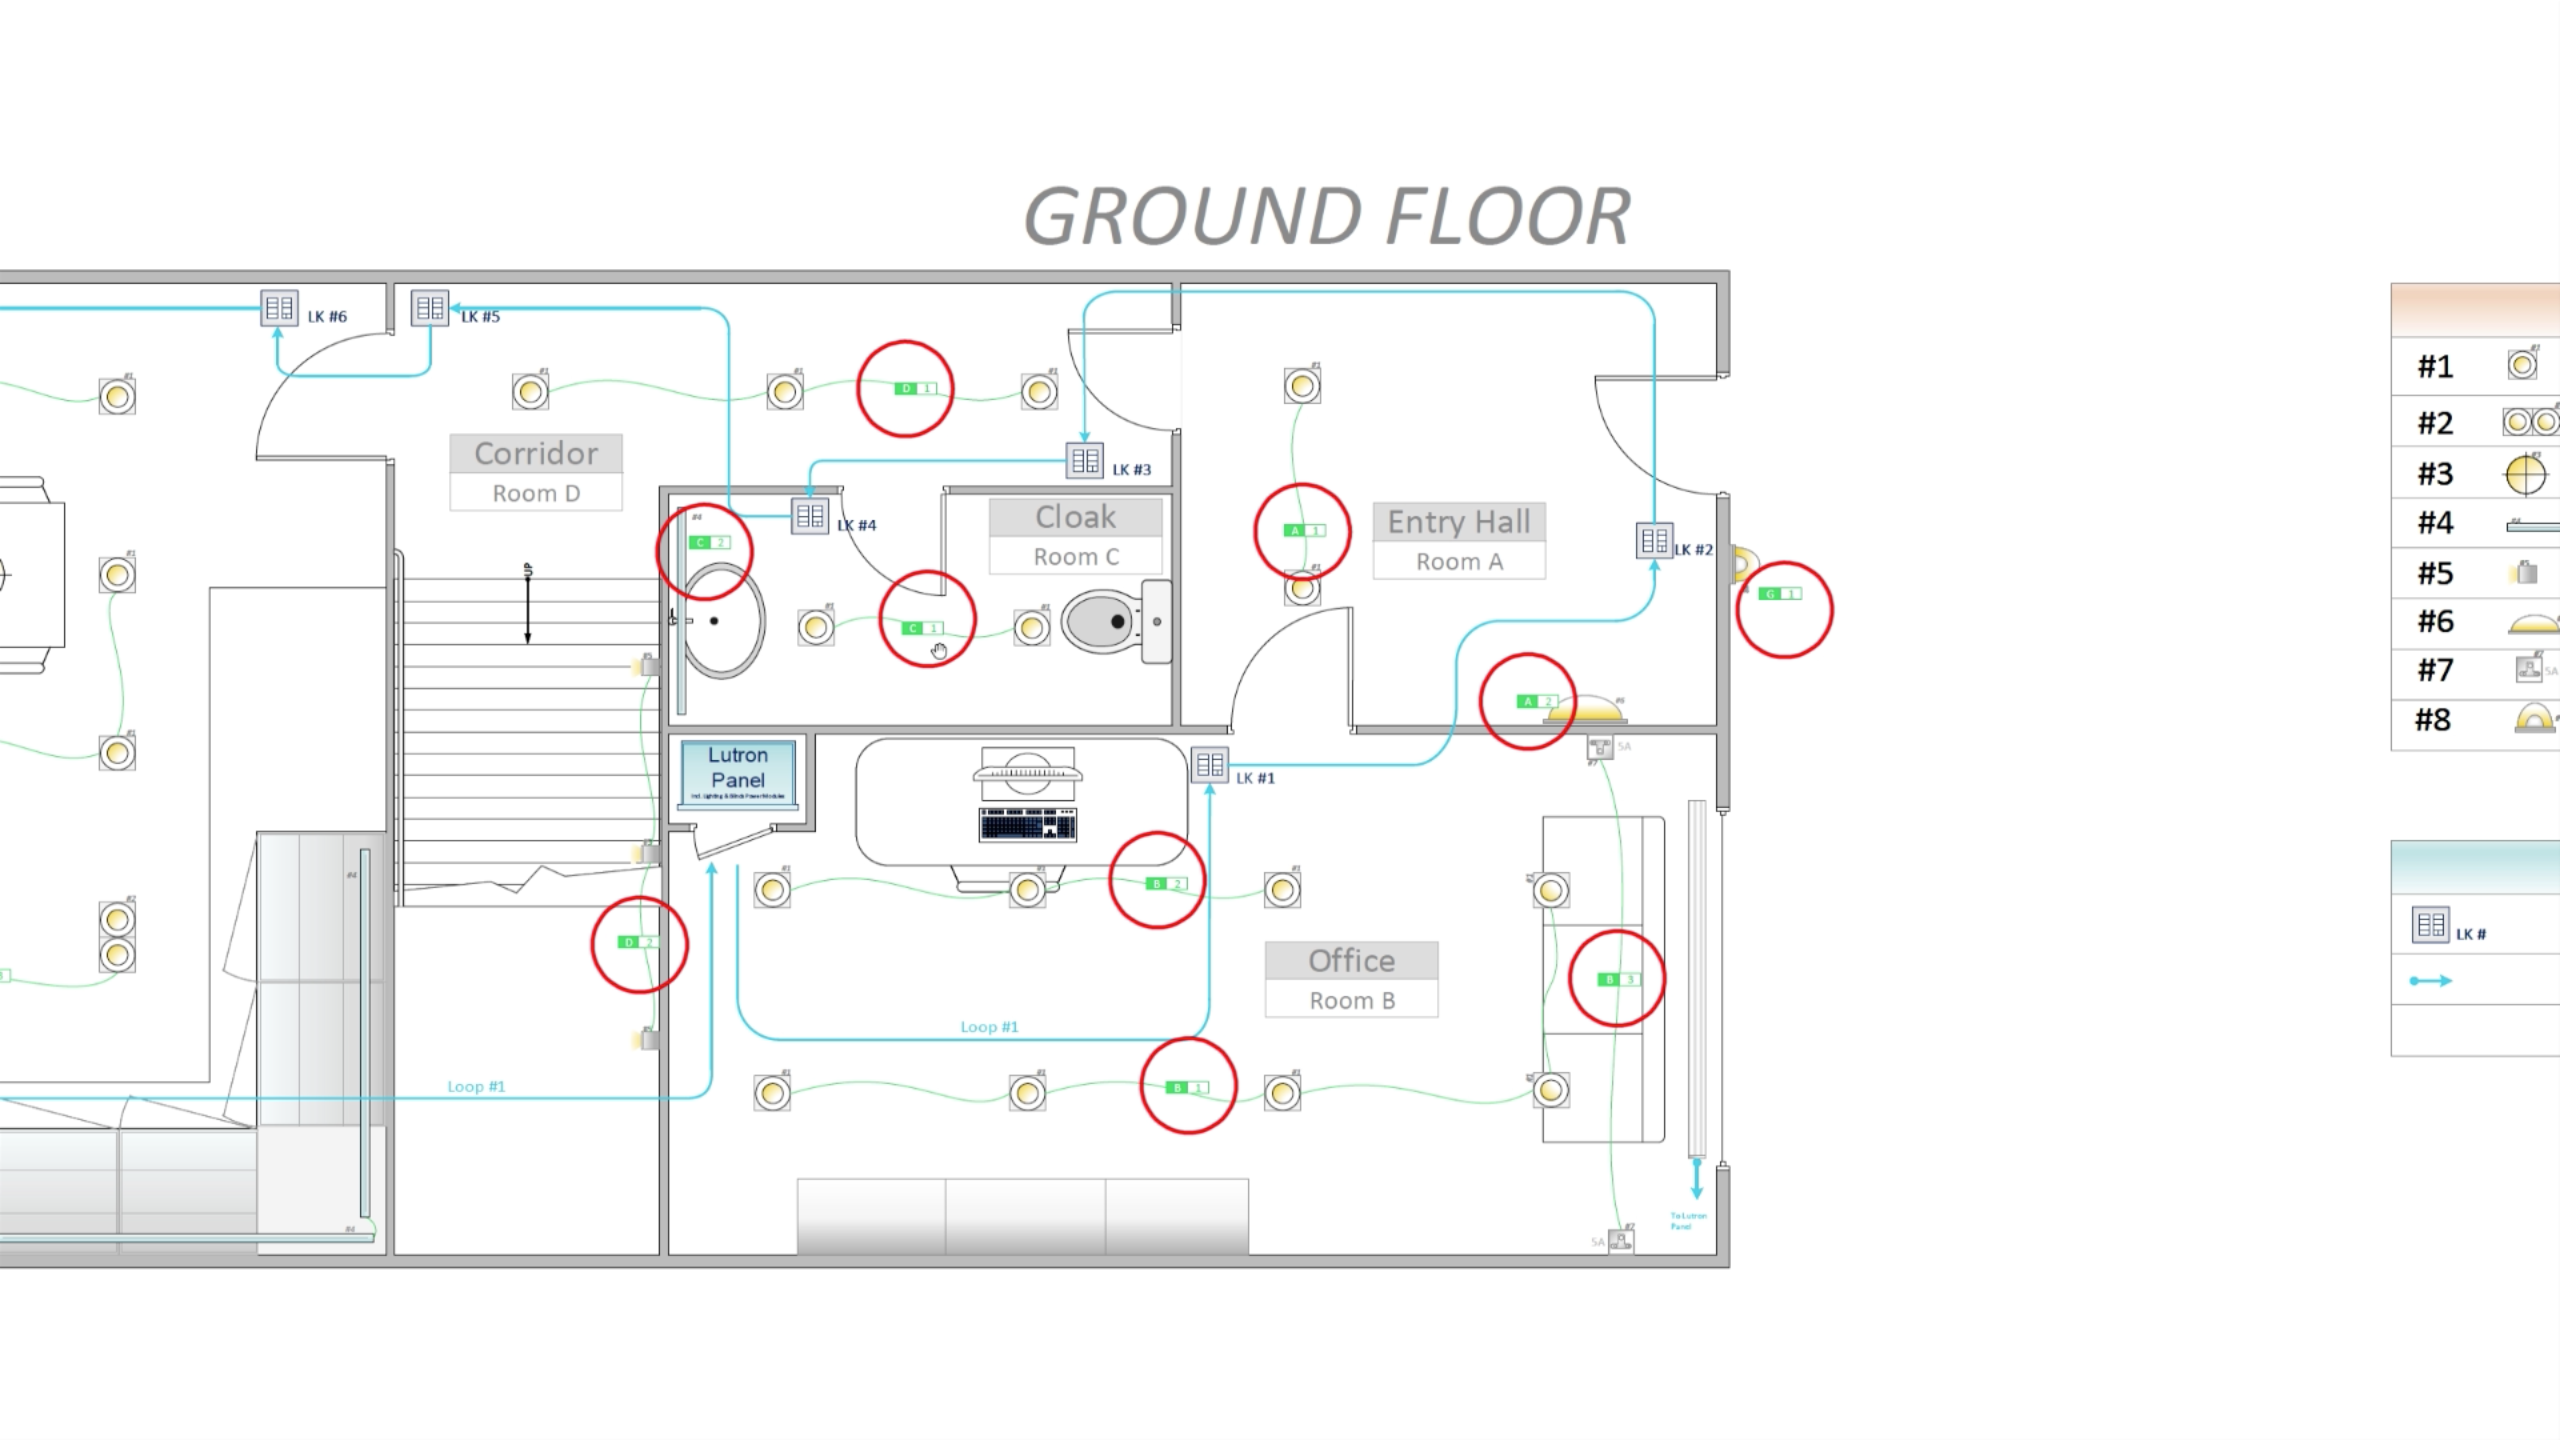
Here for exemple, we have:
  • 2 Light fittings in the “Entry hall” that seem to be connected together and the name of the circuit is “A1” (also called the “Circuit Reference” or “Circuit ID”).
  •  Then, we have “A2”,
  • In the Office, we have a circuit that goes around called “B1”, an other above the desk called “B2” and a third one called “B3”.
As you can see in our exemple, Lighting circuits are named in reference of the room they are in, and in a sequence manner: “B1”, “B2”, etc…   So again, on your own Floor Plan this may be different but you have to find out how your circuits are named. This will help you throughout the commissioning of your project.
 
 “Circuit Reference” are important to know because this is how the electrician called those circuits. So if at some point during the commissioning of the Lutron System, you encounter an issue on one of the Lighting circuit, you can say to the Electrician “ Hey, I have an issue on circuit B2″and he will know straight away which circuit you are talking about.   That will be more efficient than saying  “Hey, I have an issue on the second output of the Lutron Module number 3”, for exemple.
 
Also, this is how the “Lighting circuits” will probably be referenced back at the Lutron Panel.
Lighting Circuit references
Click to enlarge

Load Type

Lighting Circuit references
Click to enlarge

We need to fully understand How each Lighting Circuit is controlled, which means:

  • Is this circuit switched?  (On / Off).
  • Or is this circuit Dimmable?

And if it is dimmable what sort of dimming method is it using?
For exemple:

  • Is it mains Dimmable?
  • 0-10v dimmable?
  • DALI Dimmable?

This will allow you to create and programmed those circuits correctly on the Lutron Homeworks QS software.
To help you with this, you will find in general a “Legend” for the key symbols on your floor plan.
If you can’t find it there you should ask:

  • The Lighting Designer
  • Or the Electrician
  • Or whoever supplied the light fittings for your project

So lets have a look at our lighting legend

Here, we have:

  • A key for a single recessed downlight with the information that is a “Mains dimmable” load.
  • Then, we have some double recessed downlights, also “Main dimmable”.
  • Some decorative pendant,  “Mains dimmable”.
  • LED Strips, which are “0-10v dimmable”.
  • Some other “Mains dimmable” light fittings.
  • And to finish, some external wall lights that are “Switched”

Let’s move on the the last item.

Lutron Keypads

The last key element that you need to check on your Floor Plan is the position and wiring of the Lutron Keypads.
First, you will have to check on your Floor plan, how the Lutron keypads are represented.

Here we have,

  • A keypad by the main entrance in the Entry Hall.
  • An other on by the door in the office
  • A keypad in the Corridor “by the entry Hall” and an other one “at the bottom of the stairs, etc…

You will soon realise that it is quite handy to add a bit of description when you create keypads in your own Lutron Homeworks QS database.
Sometimes,  you may have a reference or ID for each keypad on your own floor plan. I would advise you to use that reference to identify your keypad on your Lutron Database .

An other information that I have here, is that the Lutron keypads are connected to one an other using a Lutron communication cable. That connection or wiring seems to be done as a loop, which means that it starts at the Lutron Main panel and comes back to it. Please note that the wiring of the keypads doesn’t have to come back to the panel but it is a good practice to do so.
Anyway, it is important to know how your keypads are wired to one an other and on which link of the Lutron Homeworks QS processor they are connected to;  so you can add this information on your Lutron database, for the program to execute properly.

Lutron Keypad Position
Click to enlarge

Conclusion

There you have it,
When you start the commissioning of a Lutron Homeworks QS system, the key information you need to look at on your own Lighting Floor plan,  are:

  1. The “Name of the rooms”,
  2. The “Lighting circuits” and their “Load type”,
  3. How the “Lutron keypads” are connected back at the “Lutron Homeworks QS processor”

One Last Thing...

Now, if I can share my own experience, I would say that please use the exact names and references from your own Floor plan.
What I mean by that is when you start your commissioning, don’t try to change the name of a room or a lighting circuit because that makes more sens to you.
The Floor Plan is used by everyone on site and calling the elements in a different way can lead to confusion and miscommunication, specially when you have troubleshoot the system.
So make the Lighting Floor plan works for you and not the other way around!

Then once the Lutron Lighting control system has been fully commissioned and programmed and you feel like some element should be renamed (to help the Home owner for exemple), then feel free to do so at that point.

Well look, I hope this tutorial has been useful, Specially if you are about to start the commissioning a Lutron Homeworks QS system for the first time.
If you have any question, feel free to leave a comment down below.

Good luck!

Xavier

The Video: How to use a Load Schedule

Leave a Reply

Your email address will not be published.