Lutron RA2 Select Tutorial

Control4 Integration

Welcome to this Lutron RA2 Select Tutorial.
This tutorial is addressed to AV Technicians or Programmers or to anyone that would like to see how easy it is to integrate Lutron RA2 Select with Control4

Demo Presentation

Lutron RA2 Select - Demo Setup

To illustrate all the programming steps, we’ve set up a small RA2 Select Demo.

We have:

  • RA2 Select Main repeater,
  • A couple of Lutron In-line Dimmers controlling their respective Table Lamps.
  • A Pico Remote for each of those Table Lamps.
  • A Pico Scene Keypad.
  • As well as a Battery operated Lutron Wireless Blind.
Lutron RA2 Select Demo Overview Adelux
Click to enlarge
Click to enlarge

Control4 - Demo Setup

Control4 Controller EA5
Click to enlarge
Lutron RA2 Select Control4
Click to enlarge

We also have a Full Smart Home – Control4 System; running the Latest OS 3.1 as of the time of this blog.

This Control4 System controls some of our Lighting, Audio and Video Equipment as well as the CCTV, Intercom system etc…

Furthermore, I need to mention that, all this equipment has been programmed and sit on the same Ethernet network.

Lutron RA2 Select - Initial Setup

The very first thing we have to do, is to fully program my Lutron RA2 Select System using the Lutron RA2 Select App.  

If you need to know how to complete this initial setup to begin with, I’ve posted a step-by-step video guide that you can find on the link Here.

Lutron RA2 Select on iPhone
Click to enlarge
Lutron RA2 Select App Overview
Click to enlarge

Now, let’s have a quick look at my RA2 Select App,

I have my two Table Lamps:

  • One called “Black Table Lamp”.
  • and the other one “White Table Lamp”.

As well as their respective Pico Remotes

  • One called “Pico – Black Table Lamp”
  • and the other one “Pico – White Table Lamp”

My Lutron Wireless Blind has also been setup. As well as the Pico Remote that operates it.

Additionally, I have a Pico Scene Keypad.

At last, under the “Scene tab”, I have set up a couple of “Scenes”.

  • One called “Movie Scene”,
  • And another one called “Living Room Off” – Which includes a mixture of lighting levels and Blinds positions.
Lutron RA2 Select App Scenes
Click to enlarge

Generate Integration Report

Click to enlarge
Lutron RA2 Select App Integration
Click to enlarge

Basically, the objective is to export this Lutron information to my Control4 System.

To do so, from the Lutron App, I go to “Settings”/ “Advanced” /“Integration” / “Send Integration Report” 

At this point, the Lutron App prepares an email that contains all the Integration ID’s of all the Lutron devices and other objects.

Those Integration ID’s will help for the integration of the Lutron RA2 Select system with 3rd Party Control System such as Control4.

I’ll then send that email to myself.

What is an Integration ID?

In essence, an Integration ID is a simple number, generated automatically by the Lutron System.

In fact, each Lutron equipment has its own Integration ID assigned to it.

That ID Number will help me setting up my Control4 system to operate as well as to listen to my RA2 Select System.

Lutron RA2 Select Integration ID email
Click to enlarge

Let's have a closer look at this Integration Report

Lutron RA2 Select Repeater Integration ID
Click to enlarge
Lutron RA2 Select Scenes Integration ID
Click to enlarge

To start with, we have a “List of Devices”.

The first device shown is the “Smart Bridge 2” which refers to the RA2 Select – Main repeater that will use the Integration ID# 1.

What we also need to know is that the Main Repeater offer access to 100 System Scenes.

We can find amongst those scenes, my “Movie” and my “Living Room Off” Scene.

But also Scenes called “Arriving Home” and “Leaving Home”; which are scenes that are setup by default to use with the Geo-Fencing feature.

Then, scrolling down the list, I’ll find the other Lutron devices such as:

  • My Picos,
  • My inline dimmers,
  • My Motorised Blind

And as we notice here, each of those Lutron Equipment has its own Integration ID.

We will understand more about ID’s shortly.

At this point, I launch the Control4 Software called “Composer Pro”.

Click to enlarge

Control4 - Programming Overview

To make this work on the Control4 Software, we will have to:

  • Add the relevant Lutron RA2 Select Drivers initially.
  • Then, make the Connections of the Lutron Equipment within Control4 Composer
  • And to finish, do the Programming so the 2 systems can talk to each other.
Control4 Composer Overview
Click to enlarge

Add Lutron RA2 Select Drivers

Search for the Lutron RA2 Select Drivers

Control4 Lutron RA2 Select Drivers
Click to enlarge

To begin with, I’ll add the Lutron Drivers.

  • Under “System Design”, I’ll use the “Search” Tab
  • And Type in “Lutron RA2 Select” with my “Local” and “Online” options ticked followed by “Enter”.

Consequently, I’ll find below a list of available Lutron RA2 Select Drivers.

Add Driver for the RA2 Select Repeater first!

The first driver I’ll have to add, is the “Lutron RA2 Select Repeater” Driver.

To do so, I select the room it needs to go in. In our case here today, I am going to select the “Living Room”.

Then, I double click on the Repeater Driver.

Once this is done, I’ll add all the other drivers that match my Lutron RA2 Select Setup.

Lutron RA2 Select Control4 repeater Driver
Click to enlarge

Add Drivers for the other RA2 Select devices

Lutron RA2 Select Control4 Dimmer Driver
Click to enlarge
Lutron RA2 Select Control4 Shade Driver
Click to enlarge

Firstly, I’ll add drivers for my In-line Dimmers using the “Lutron RA2 Select Dimmer” Driver:

  • I need one for my “Black Table Lamp”
  • and an other one for my “White Table Lamp”

Secondly, I’ll add the driver for my Lutron Motorised Blind, using the “Lutron RA2 Select Shade” Driver.

Finally, I’ll add my Picos using the “Lutron RA2 Select Pico” Driver

  • I’ve got one for my “Black Table Lamp”
  • and an other one for my “White Table Lamp”
  • I’ve got one to operate my “Sheer Blind” too.
  • I also have a Pico Scene Keypad that uses the same driver

In summary, It doesn’t really matter in which order you add your Lutron Drivers.

The most important is that you add the Driver for the RA2 Select Main repeater, first.

Lutron RA2 Select Control4 Drivers
Click to enlarge
Lutron RA2 Select Control4 Driver Description
Click to enlarge

In addition, I will also recommend to read through the documentation for each driver. As it will give you a good overall understanding of the Lutron RA2 Select Integration Process also.

Once I’m done with the Lutron Drivers, I’ll move on to “Connections”.

Establish the "Connections"

Lutron RA2 Select Integration ID
Click to enlarge

At this point, the objective in the “Connections” tab is to associate each Lutron Device with the correct Integration ID.

So let’s pull back that Integration Report.

At the present time, we will leave the Main Repeater ID aside and go for the next device. Which in my case is the Pico for the Blind in the “Living Room ” called “Pico Blind”.

Its integration ID is “5”

In Composer, I’ll therefore select my “Pico Blind”, then I click on its “Control Input Connection”. 

All of a sudden, all my Lutron Integration ID’s available from my RA2 Select repeater will appear on the bottom screen.

In order to complete the connection, I’ll simply drag that Pico Connection to ID#5.

Lutron RA2 Select Control4
Click to enlarge
Lutron RA2 Select Control4
Click to enlarge

Subsequently I will do exactly the same thing for all the other Lutron Devices, using my List of Integration ID’s.

As previously mentioned, the order in that list doesn’t really matter as those ID’s are simply there to identify our devices.

In other words, those ID’s are like a name that both control systems will use to talk to one an other.

Once I’m done with my “Connections”, I can start programming my equipment.  So let’s select the “Programming Tab” on the bottom left of the screen.

RA2 Select Control4 Integration - "Programming" Examples

To sum up, in “Programming”, you will enjoy and benefits from large array of possibilities with regards of the integration of a Lutron RA2 Select system with Control4.

Presently, I’ll just show some very basic programming examples; just so we can understand the principles.

Control4 Touch screen Adelux
Click to Enlarge

Operation from the Control4 Navigators

Control4 Touch Screen Lighting Control
Click to Enlarge
Control4 Touch panel Blind control
Click to Enlarge

I believe that undoubtedly, the most basic but also most existing thing to see is that as soon as we’ve added and connected our Lutron Devices, they’ve become immediately available from our Control4 Navigators.

Thus, if I take my Control4 tabletop touch-screen for example and select my “Living Room”. Under “Lights”, I’ll find my “Black” and “White table Lamp” dimmers.

As a result, I can Turn “On” &  Switch “Off” each of those lighting circuits as well as dim them!

Additionally, I can also “Open”, “Close” and “Adjust” my Lutron Shade.

Control4 to RA2 Select - Programming Example

Meanwhile, in the “Living Room”, I have a Control4 Keypad where the bottom button is a “Room Off” button.

Which in brief means that it turns “Off” all Audio and Video Equipment in that room.

Therefore, If I need that button to also switch “Off” the Light and “Close” the Lutron Blind, I can Program it to do so.

Let’s see how to do it…

Control4 Dimmer Keypad
Click to Enlarge
Lutron RA2 Select Control4
Click to Enlarge
Lutron RA2 Select Control4
Click to Enlarge

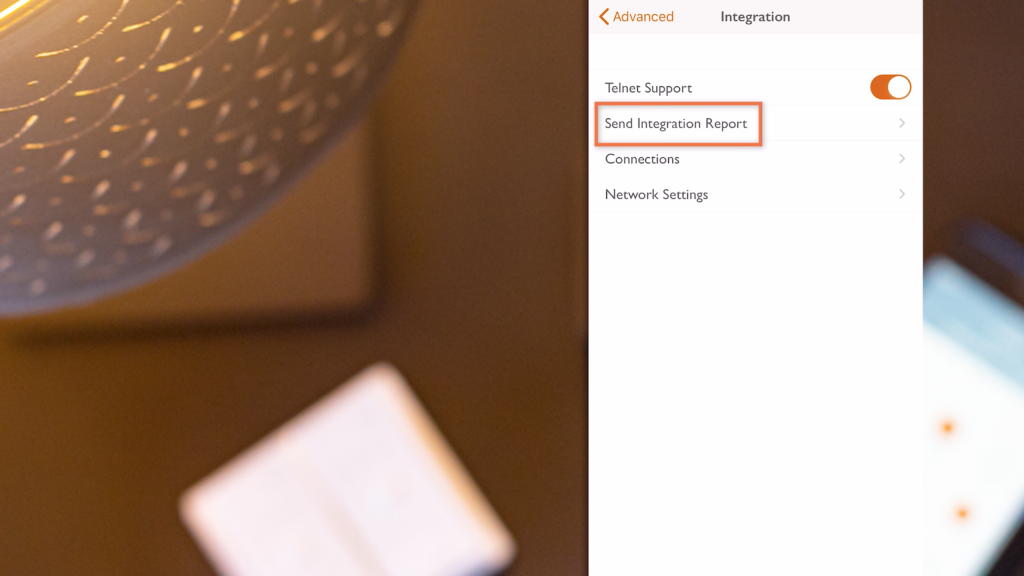
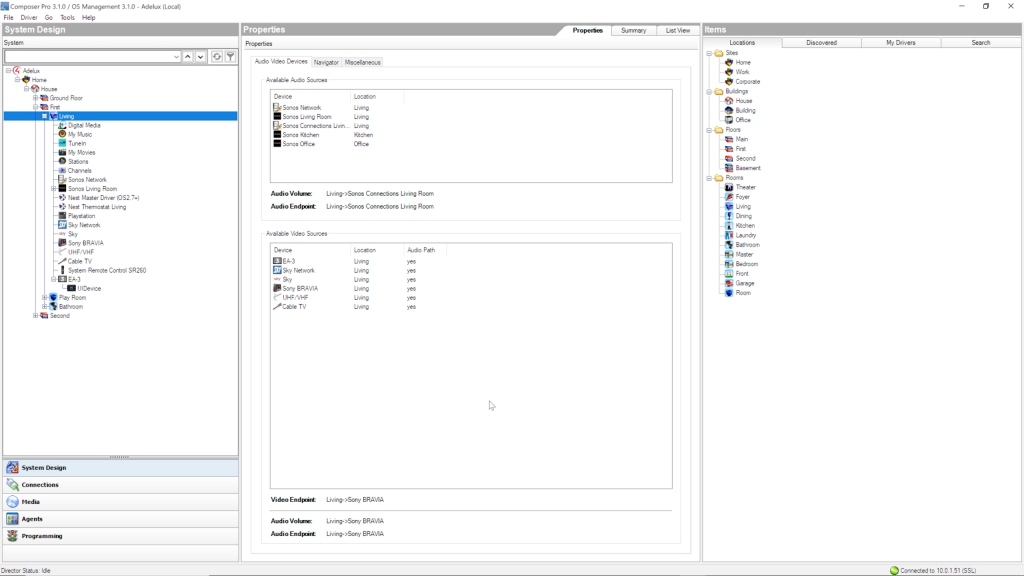
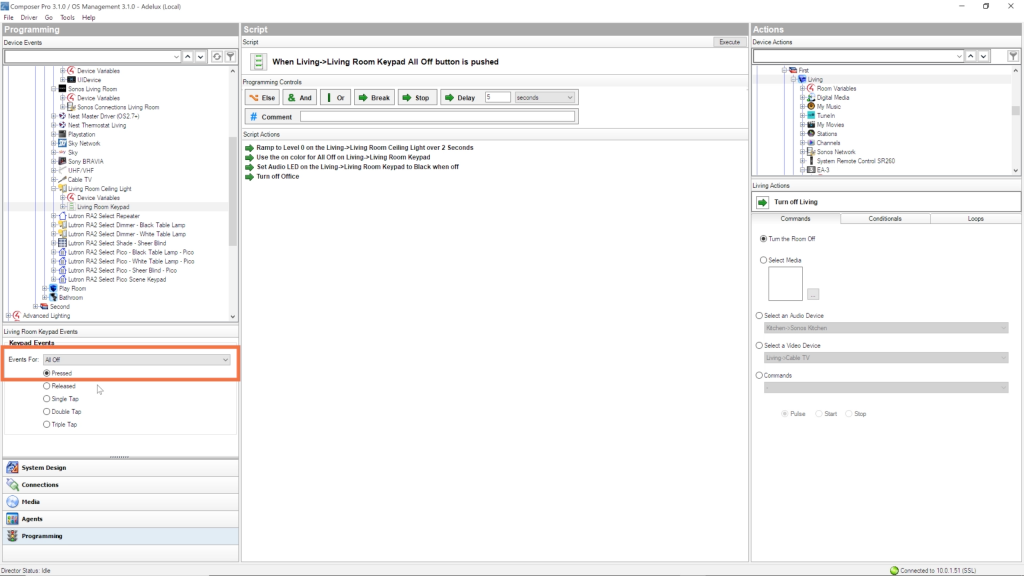
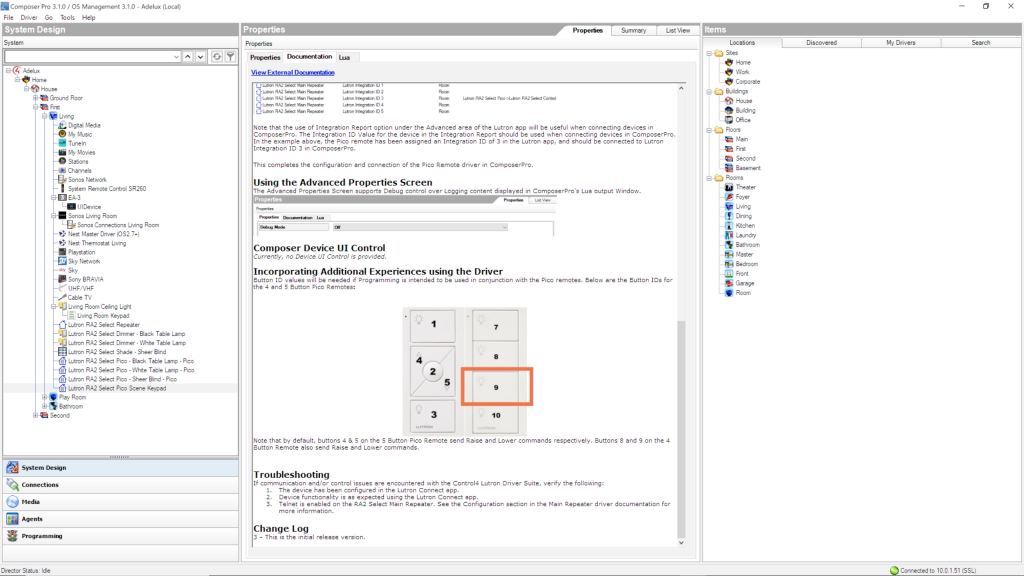
Firstly, under “Programming”, I’m going to find & select that button on the left hand side of the screen.

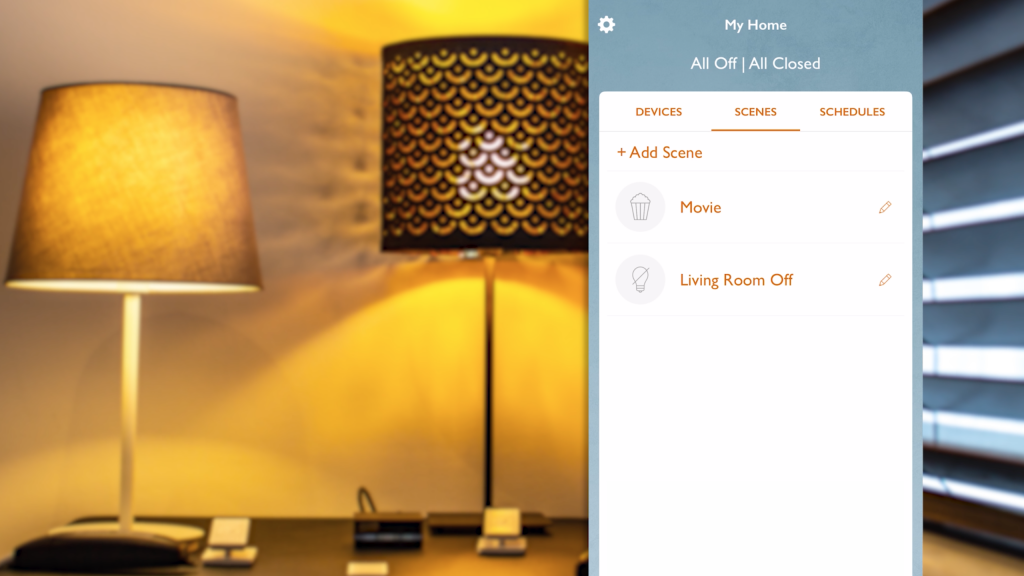
So here, I select the “All Off” Button and the “Pressed” Event.

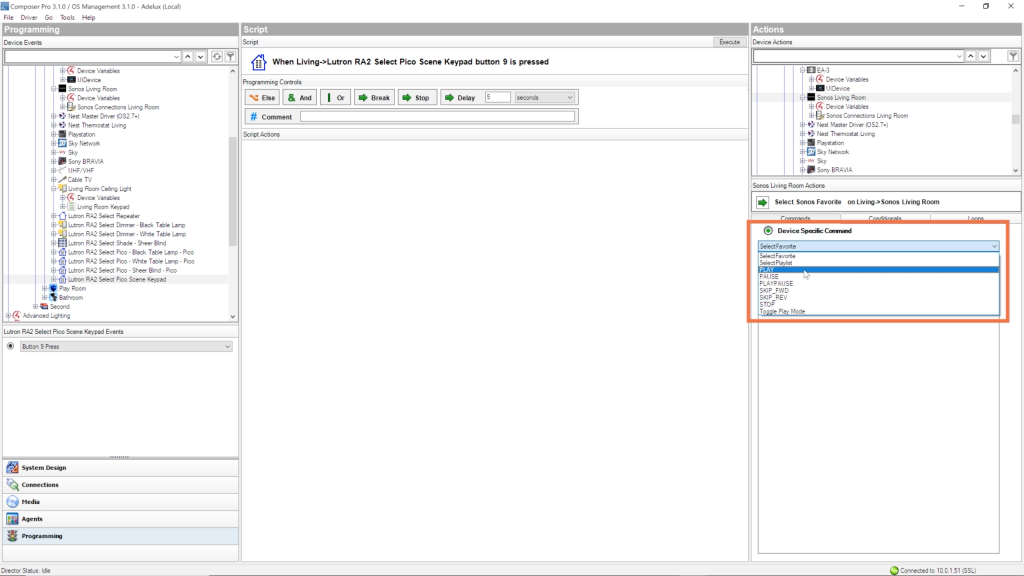
Then from that point, I can do 2 things:

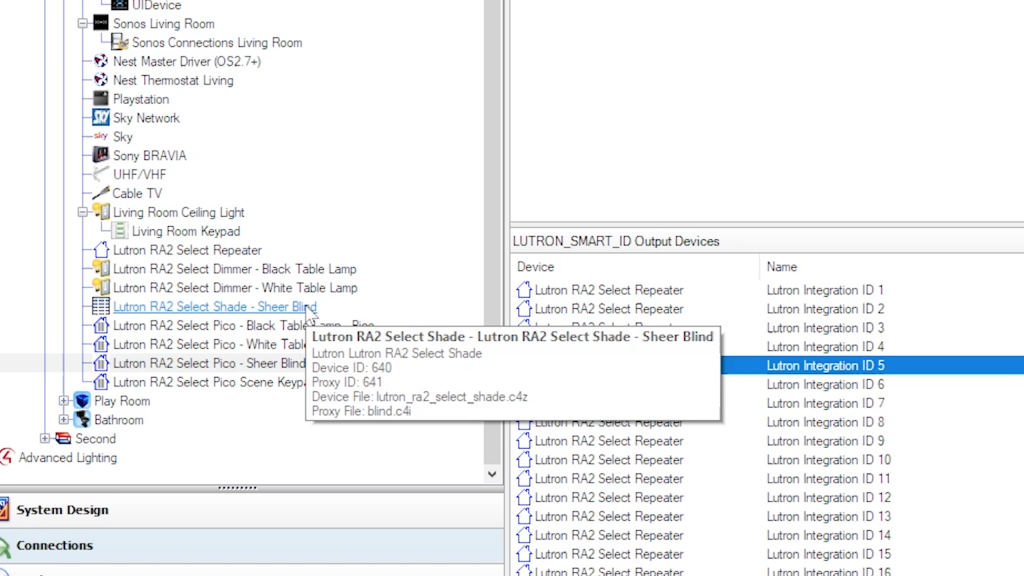
1. Access Lutron Devices Directly 

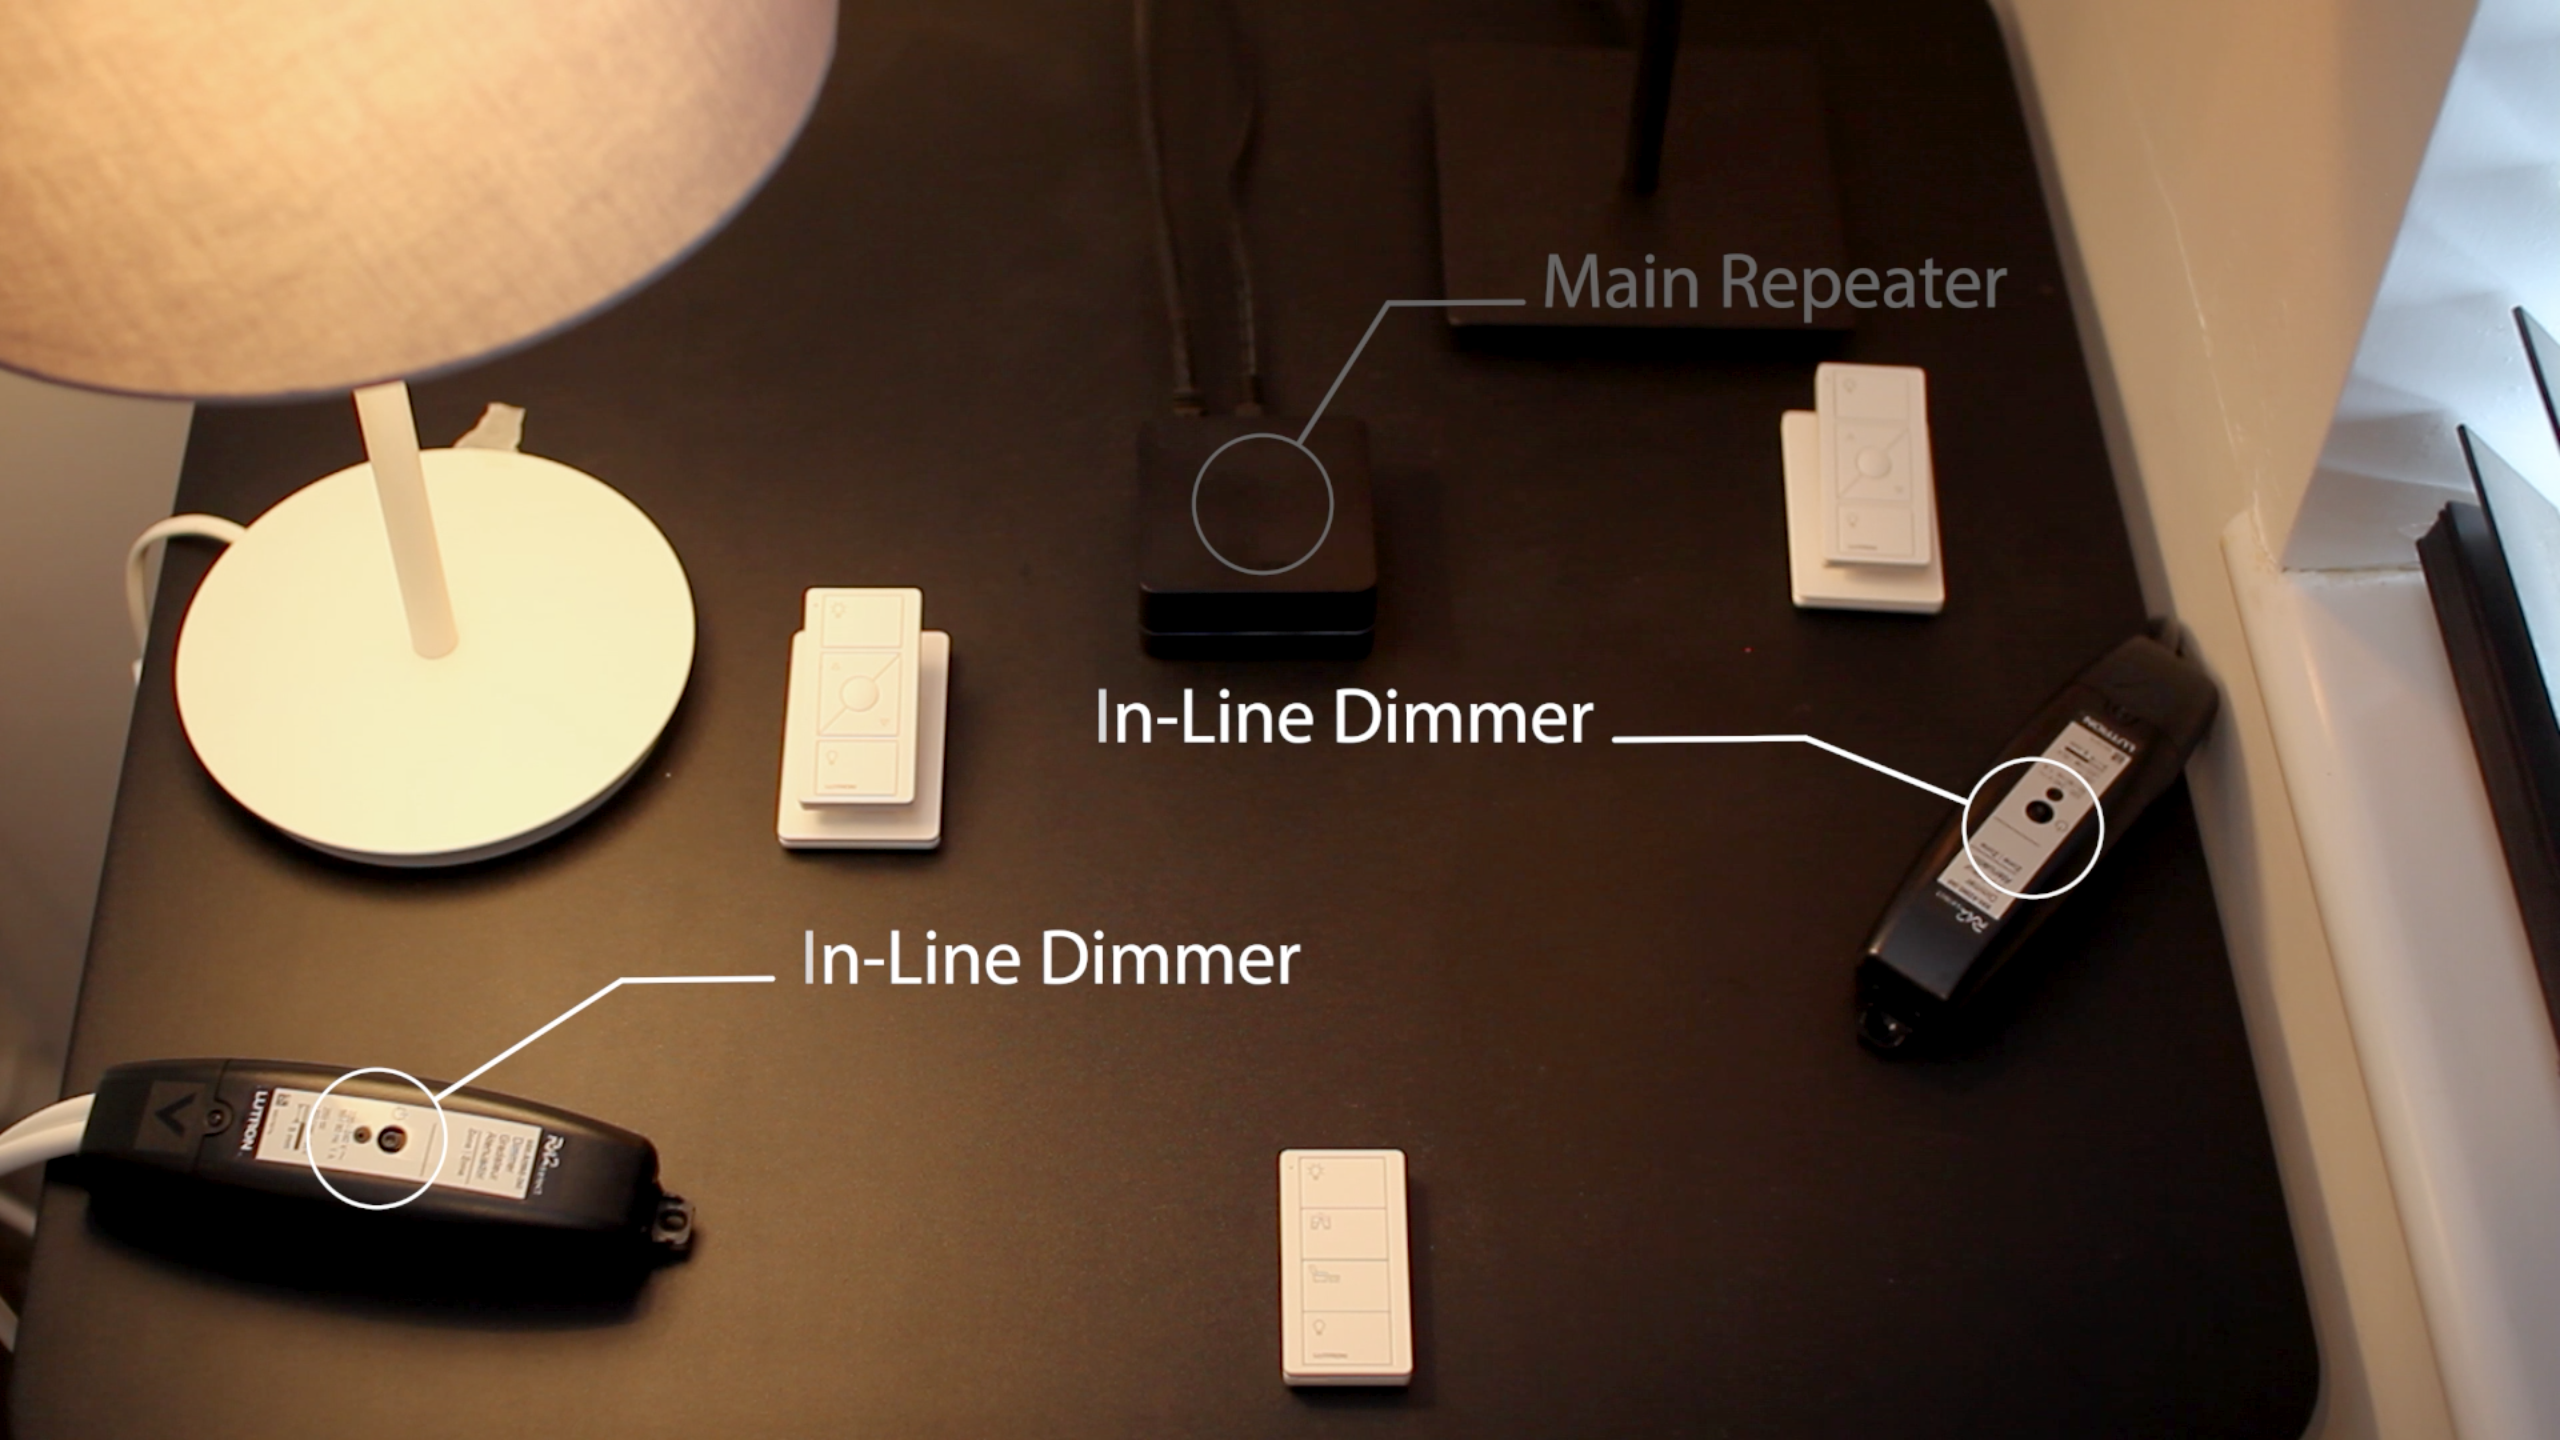
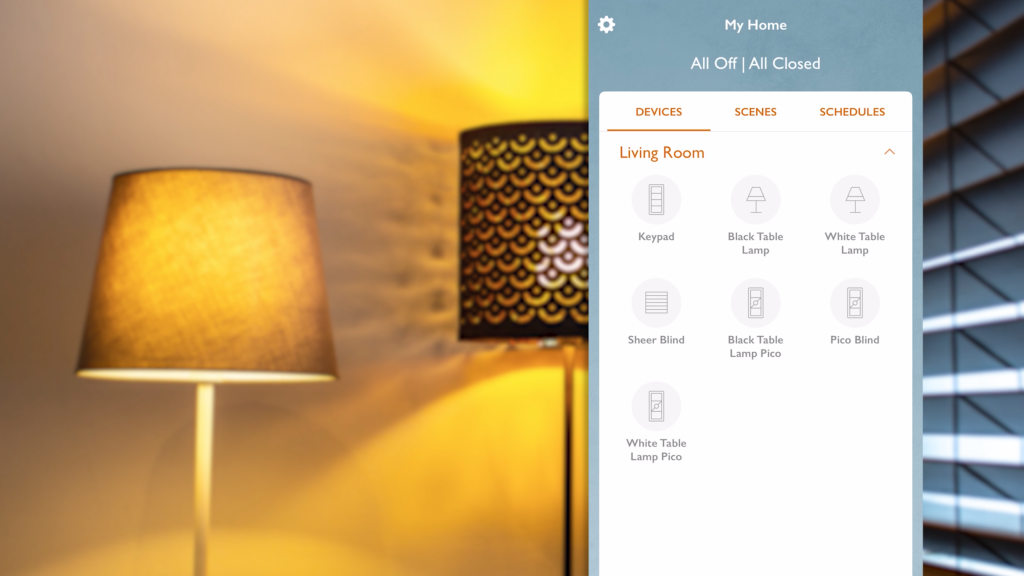
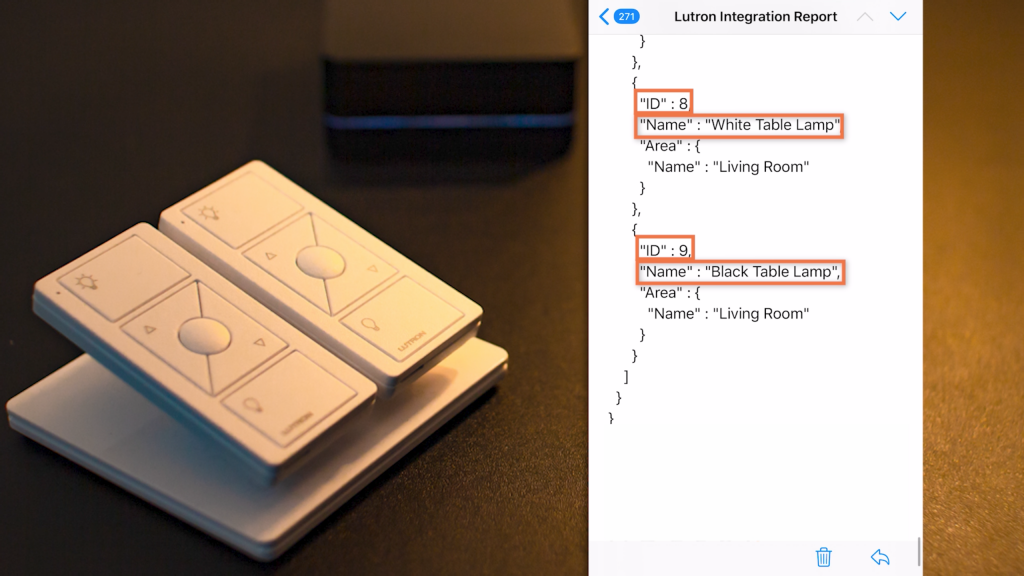
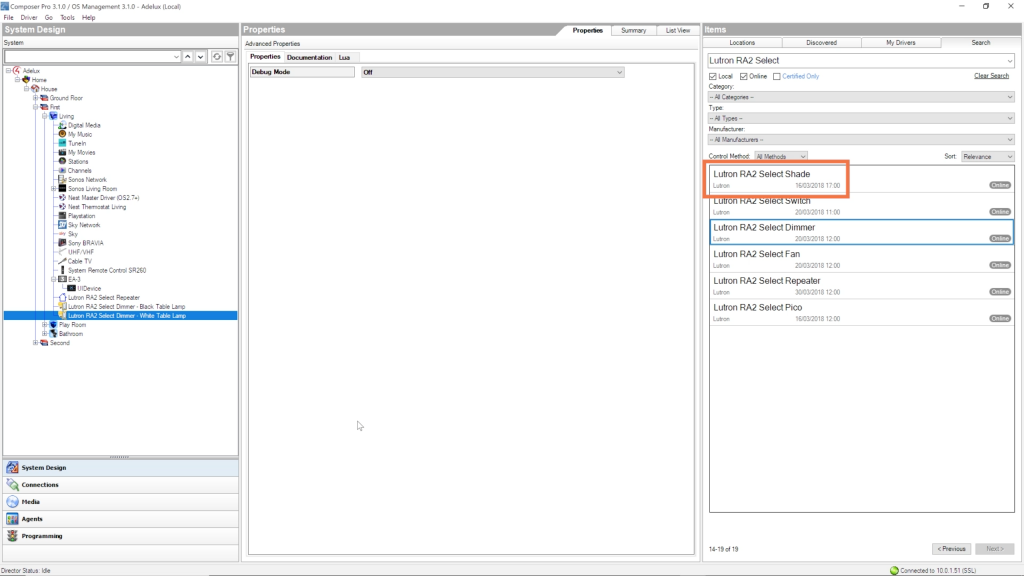
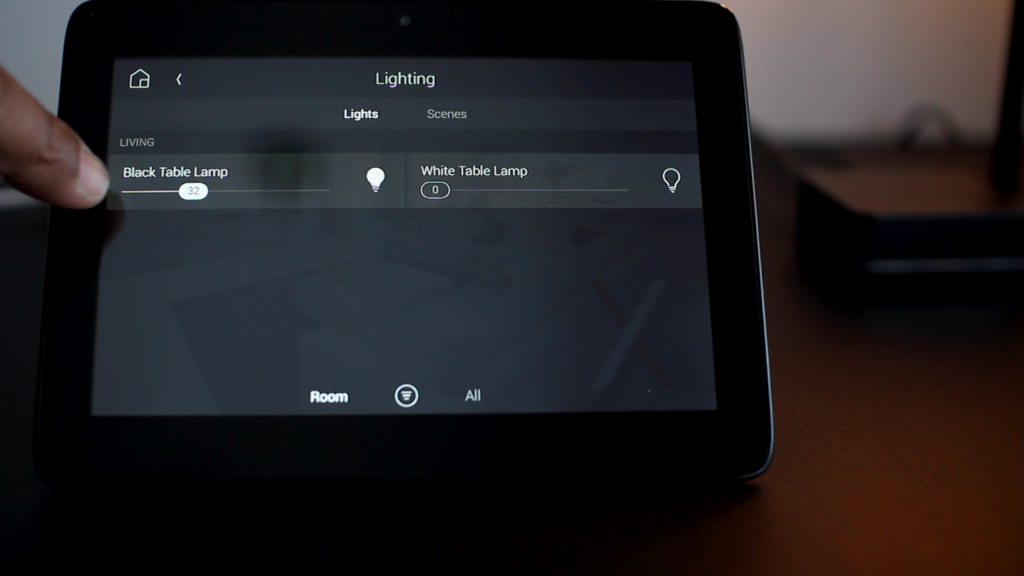
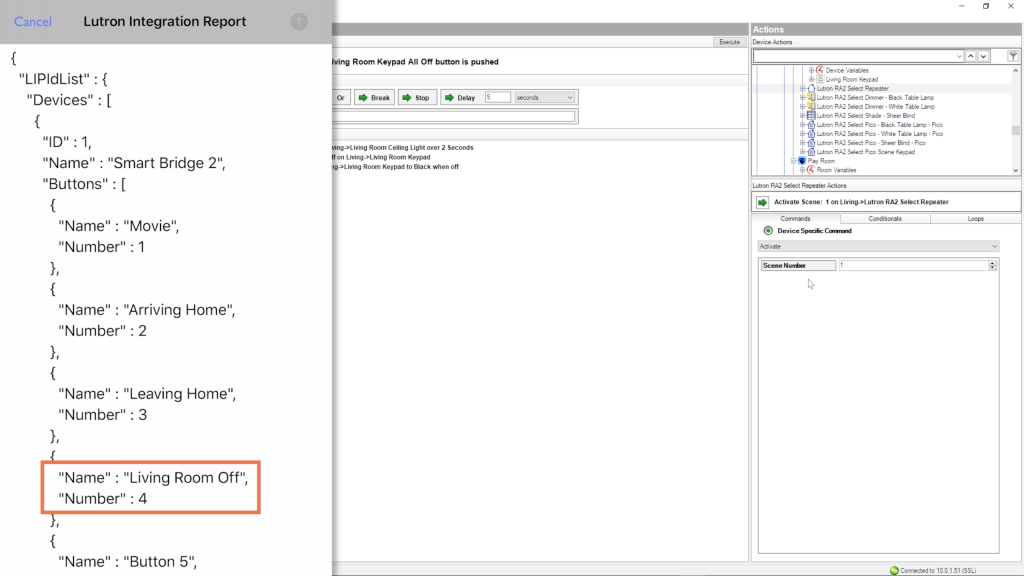
First, on the right hand side of the screen, I can go and find my Lutron dimmers like the “Black Table Lamp” for example.

Then, Select the command to Switch it “Off” then add it to my programming script.

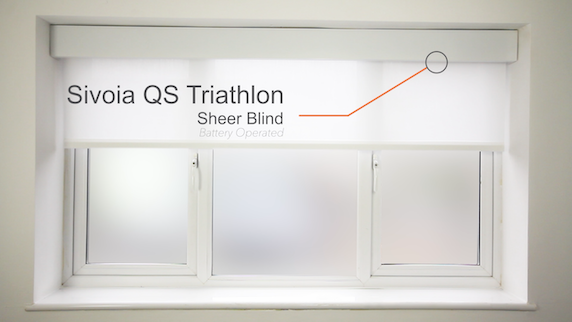
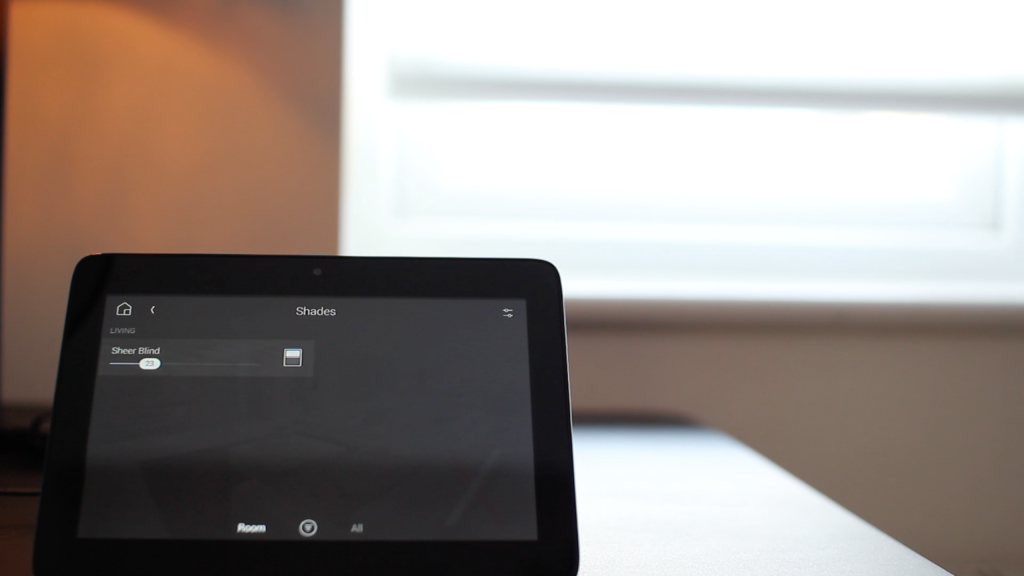
I can obviously do the same thing for the “White table lamp” as well as to select my motorised blind and set it to “Close”.

2. Access Lutron Scene

An alternative way to do this is to, instead of selecting and set each Individual Lutron Equipment, I can use a Scene that I have previously setup within my Lutron RA2 Select System.

To do so,

  • I delete my previous programming,
  • And instead, go to my RA2 Select Repeater and Select it.
  • Then, on the “Action Screen” below, I’ll select “Device Specific Command”, which will allow me to “Activate” a Scene.

Do you remember … A scene?!

Lutron RA2 Select Control4 Integration Example
Click to Enlarge
Lutron RA2 Select Control4 ID
Click to Enlarge

These are the Scenes at the beginning of my Lutron Integration Report.

In there, I have a “Living Room- Off” Scene that is not using an ID but a Number – Number 4.

That’s the number I need to use in my Control4 Program, and therefore I will add it to my Programming Script.

Now that this scene has been added, let me test it.

As can be seen, when I press on my “Room Off” Button and I have all the AV equipment Switching “Off”.

As well as my Lutron lights switching “Off” together with my Lutron blind closing.

All from one single press. Which is great!

Lutron RA2 Select Control4 Integration Test
Click to Enlarge

RA2 Select to Control4 - Programming Example

In this example, let’s program a Lutron Pico Scene Keypad to talk to Control4 .

In the “Living Room”, I have a Sonos Speaker as part of my Control4 Setup.

This could have been a TV or any other Audio or Video equipment controlled via Control4.

Lutron RA2 Select Pico
Click to Enlarge
Sonos SL Lutron RA2 Select Control4 Integration
Click to Enlarge
Sonos SL Lutron Pico and repeater
Click to Enlarge

So, let’s Say that, when I use my Pico Scene Keypad to trigger my “Relax Scene”. I would like it also to play some music in the “Living Room”.

To do so, I first select my Pico Scene Keypad. Then I select the appropriate button for my “Relax” scene.

To know which one to use, I need to go back to the “System Design” screen.

And within the “Documentation” Tab of my Pico Scene Keypad,  I can find the information on which button to use.

My Pico Scene Keypad has 4 Buttons and the “Relax” scene is the 3rd one down. Therefore, I will be using Button #9.

Now that I know this,  I go back to my “Programming” Screen. Then Select “Button 9 – Press” in the “Event List” for my Pico.

Next, I’ll look for my “Living Room” Sonos driver and select the appropriate action such as “Play” or “Select a Favorite Radio Station” to play.

Now, Let’s test it.

Lutron RA2 Select Control4 Documetation Screen
Click to Enlarge
Lutron RA2 Select Control4 Composer Pro
Click to Enlarge
Sonos One SL
Click to Enlarge

As we can see, when I press on my “Relax” scene, my table lamps that are controlled via Lutron in-line Dimmers, go to that “Relax” scene levels as well as my Lutron Shade.

And the same time, my Sonos started playing some nice relaxing tunes … !

There you go!

Voila, there you have it!

We just integrated a Lutron RA2 Select System with Control4.

We saw that:

  • Firstly, we have to complete the programming of the RA2 Select system and generate the Integration report.
  • Then, on Control4 we have to add a Drivers for each Lutron Equipment that we want to integrate starting with the RA2 main Repeater.
  • Following by completing the Connections of the RA2 Select equipment using the Integration Report.
Click to Enlarge
Control4 Touch screen Adelux
Lutron RA2 Select Control4

Once done, we managed

  • Firstly, To access the Lutron Devices via the Control4 Navigator.
  • Secondly, To program a Control4 equipment like the Control4 Wall Keypad to operate the RA2 Select system
  • Finally, To program a Lutron RA2 Select Pico to operate an AV equipment thats was part of my Control4 set up.

If you find this tutorial useful, please consider to Like and Subscribe.

If there is also a specific feature you would like me to cover in the future, or any question about the Lutron RA2 Select Control4 Integration, please let me know in the comment section below.

Thank you very much
And talk to you again on the next tutorial.

Xavier

The Video: Lutron RA2 Select & Control4 Integration

Learn More About Lutron Lighting Control Systems

Leave a Reply

Your email address will not be published.